Normally I post about new system on chip technology, source code, or scripts that I have written. This post doesn’t follow the same theme, however; I will discuss some of the technology used during my adventures in teaching a STEM class.
Setting the Stage
Years ago when I was attending college, I tutored programming students in a classroom setting. Three evenings during the week I would host different programming sessions based on topics the professors were currently teaching in their classrooms. I had sessions on C, C++, and Java programming- all of which were slow to catch on. However, before I knew it the classes were packed. I found a niche, and the students loved the idea of agile development where we would all take turns to solve a complex problem. Instead of focusing on the theory of abstract data types, we implemented them, enduring all of the failures and successes in between. These sessions were one of the most rewarding things I have done in my life, and I wasn’t even getting paid. Students’ homework and test grades sored to the point that the professors accused me of writing their assignments! I still have mixed emotions about their claims… I digress. The point is, I fell in love with the moment the lightbulb went on for a student.
Let’s fast forward
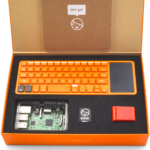
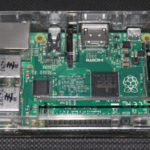
Many years have passed and I have some grey hairs. This is probably because of the endless responsibilities of being married with 4 kids, a dog, and a personal business in addition to my regular career. Over the years, my wife would remind me of how much I enjoyed teaching, and recently there has been a push for schools to explore STEM. I started researching STEM products for kids over summer of 2015, but for the most part I was not impressed with what was out there. Eventually, I stumbled into a open source product named Kano which started off as a Kickstarter Project.  Kano’s slogan was, “A computer that anyone can make”, and I found the concept fascinating. The biggest problem the original Kano had was that it ran on Raspberry Pi Version 1, which made for a horrible user experience. Since then, the product supports Raspberry Pi 3, and the user experience is at least 5 times better. The “Kano Kit” comes with a Raspberry Pi 3, keyboard, clear plastic case, built in speaker, power supply, HDMI cable, and an 8Gb Micro SD card with an adapter. Unfortunately, this total package will run you $149.99 before shipping. The price for the kit was too high since the school was not funding me. Using Ali Express, MCM electronics, and Amazon I was able to buy a
 ll of the required parts for a lot less. Ali Express is a great site to buy Pi cases for under a dollar. But if you want a really nice case, you will spend just over a dollar. The case I had selected provided quick access to all of the GPIO, CSI, and DSI connectors. I was able to buy 35 cases for barely over a dollar each. I did this by asking if they can adjust the shipping price for a bulk purchase, otherwise they will charge you the per unit shipping cost. MCM allows you to buy in bulk with free shipping and no sales tax. The real savings was on bulk power supplies, costing about $4.82 per unit. When combined with the $35 dollar Pi, leaves you at a whopping 39.82 per unit. Amazon is great for 8gb memory cards, and a 25 pack of SanDisk Ultra 8GB UHI-I/Class 10 Micro was $94.99. That’s $3.76 a unit! We used the existing keyboards, mice, and monitors in the school’s computer lab. Our total Pi cost was $39.82 each and were able to get Kano OS for free since it’s an open source product. I was able to start a STEM program for a 30 student classroom for under $1200 dollars vs 4497.99 with Kano branded kits. Hopefully the STEM program is an overall success, so we can justify purchasing the awesome all-in-one kits.
Unforeseen Technical Issues
The school had to purchase IOGEAR 2-Port USB KVMs and Rankie Gold-Plated Active HDMI HDTV to VGA Adapters since their lab didn’t have KVMs and their monitors didn’t support HDMI. Luckily, they covered the cost by charging the students a 20 dollar program fee.
Summary
It’s possible to get a STEM program off the ground and not completely break the bank doing it. You should plan for some unexpected technical hurdles during your first STEM session. Kids are really impatient and they love powering off their Raspberry Pi’s during the initial boot of Kano OS during the repartitioning phase. Yes, this bricks their SD card, so be ready to reimage them if this happens! Also, after all of the hardware arrives, you can expect having an overwhelming feeling of dread. (possibly thinking, “Oh my gosh, what did I get myself into?!”). I realized after all the equipment arrived that I didn’t have a lesson plan for these kids, which I definitely needed! I plan on writing a continuation of this post, and also provide my lesson plans, as well as training material. Since we are currently only on the fourth session, I’m sure there are more challenges ahead.
